2021年8月22日星期日

gluten-free vegan vanilla cut-out cookies


gluten-free vegan vanilla cut-out cookies

  • PREP TIME: 20 MINUTES
  •  
  • COOK TIME: 11 MINUTES
  • YIELD: 26 - 28 2" COOKIES
  •  
  • CATEGORY: COOKIES
  • METHOD: BAKED
  •  
  • CUISINE: DESSERT

A classic gluten-free vanilla cut-out cookie for the holidays. Simple, quick to whip up, and free from refined sugar. Vegan and dairy-free.


INGREDIENTS

  • ½ cup non-dairy butter, at room temperature / coconut oil, softened
  • ½ cup honey
  • ½ tsp pure vanilla extract
  • 1/4 tsp basking soda
  • dash of salt
  • 2¼ cups gluten-free flour blend 

INSTRUCTIONS

  1. Preheat oven to 350F. Line 2 cookie sheets with parchment paper. Prepare a rolling area with two additional sheets of parchment paper for that, and have your cookie cutter(s) handy.
  2. Place butter in a large mixing bowl and whip it with a mixer until it’s creamy. Add sweetener, vanilla extract and bean, and salt and mix once again to combine. Add in flour and use a wooden spoon to mix. Then get in there with your hands and mix everything together by working the dough until you can shape it into a ball {note: as depending on the flour mix you use there may be a slight variance, know that the consistency of the dough should not be sticky but should press together when pinched — be sure to knead it really well first for some time — if it’s a little sticky, add a little more flour (try 1-2 tbsp); if it’s a little dry add a little more sweetener (try 1 tbsp)}. Shape the dough into 2 balls and then flatten each into a disk.
  3. Roll out one of the dough balls between two sheets of parchment paper to ¼” thickness {or thinner or thicker depending on how you want your cookies to turn out}. Use a cookie cutter to cut out the cookies. Carefully transfer to a prepared cookie sheets, spacing them ½” apart {they won’t spread as they bake}. Gather up any dough scraps and repeat until all dough is used up. Repeat the process with the second dough ball.
  4. Bake in a pre-heated oven for approximately 11-13 minutes, until the edges just begin to become golden. Remove from oven and place on a cooling rack. {Note: cookies will harden a little within minutes of cooling, so don’t overbake}. Allow the cookies to cool for 10 minutes and enjoy!
2021年8月19日星期四

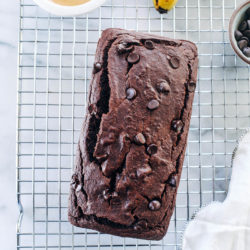
FLOURLESS VEGAN DOUBLE CHOCOLATE BANANA BREAD


FLOURLESS VEGAN DOUBLE CHOCOLATE BANANA BREAD

yield: 1 LOAF // 8 PIECES


prep time: 5 MINUTES 


cook time: 45 MINUTES


total time: 50 MINUTES

5
5 / 5 (7 Reviews)
Did you make this recipe?
Leave a review »

INGREDIENTS:

  • 2 medium-size ripe bananas (about 1 cup mashed)
  • 1/4 cup pure maple syrup
  • 3/4 cup unsweetened almond milk + 1 tablespoon apple cider vinegar
  • 1/2 cup natural creamy unsalted peanut butter
  • 2 teaspoons vanilla extract
  • 2 cups rolled oats*
  • 1/2 cup + 2 tablespoons unsweetened cocoa powder
  • 1 teaspoon baking powder
  • 1/2 teaspoon baking soda
  • 1/2 teaspoon fine sea salt (omit if using salted peanut butter)
  • 1/2 cup dairy-free dark chocolate chips

DIRECTIONS:

Preheat the oven to 350°F then lightly grease a loaf (or muffin) pan.

Combine milk and apple cider vinegar in a measuring cup and set aside for a few minutes.

In a blender, combine all ingredients in the order listed (except chocolate chips). Make sure to put the wet ingredients first otherwise the batter will become too thick for your blender. Blender for about 10 seconds, until smooth. Pour the batter out into the loaf pan and shake until evenly distributed. You may need a spatula to help scrape the batter out of the blender.

Bake in the oven for about 45 minutes, until a knife comes out clean when stuck into the center. Allow to cool for at least 30 minutes. Serve with melted peanut butter (optional), and enjoy!

2021年8月18日星期三

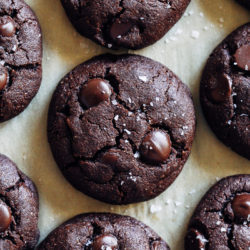
VEGAN GLUTEN-FREE DOUBLE CHOCOLATE COOKIES


VEGAN GLUTEN-FREE DOUBLE CHOCOLATE COOKIES

yield: 18 COOKIES


prep time: 10 MINUTES


cook time: 12 MINUTES


total time: 22 MINUTES

5
5 / 5 (12 Reviews)
Did you make this recipe?
Leave a review »

INGREDIENTS:

  • 1/2 cup solidified coconut oil*
  • 1/2 cup coconut sugar
  • 2 teaspoons vanilla extract
  • 2 tablespoons almond milk
  • 1/2 cup almond flour (not almond meal)
  • 1/3 cup unsweetened cocoa powder
  • 1 cup oat flour**
  • 1/2 teaspoon baking soda
  • 1/2 teaspoon baking powder
  • 1/2 teaspoon salt
  • 1/2 cup dairy-free dark chocolate chips

DIRECTIONS:

Preheat the oven to 350°F then line a baking sheet with parchment paper.

In the bowl of a stand mixer with a paddle attachment (or a large bowl using a hand mixer) combine coconut oil and coconut sugar. Mix on high for 1 minute then add vanilla extract and almond milk. Continue to mix for another 30 seconds.

With the mixer running add the almond flour first. Next add the cocoa powder, oat flour, baking soda, baking powder, and salt. Continue to mix for about 20 seconds, until a dough forms. Using a spatula, scrape down the sides and bottom of the bowl in between mixing to assure all of the ingredients are combined.  Stir in the chocolate chips at the end with a spatula.

Using a scooper or a spoon, scoop out about 1 and 1/2 tablespoons of dough at a time. Arrange them on the baking sheet with about 2 inches in between each. Bake in the oven for 12-13 minutes, until edges are light golden brown. Allow to cool for at least 15 minutes before serving. They will continue to firm up as they cool. Leftovers can be stored in an airtight container for up to 5 days. You can also freeze the balls before baking and bake from frozen when ready to eat.

*If your coconut oil is rock solid, microwave it (without the lid) for 10 seconds, or until just soft enough to scoop. If it starts to get liquid-like then you will have to refrigerate until solid again. It’s very important that coconut oil is solid for the recipe to work properly. Vegan butter will work in place of coconut oil but the texture is softer and they spread better with coconut oil. You can also use a combo of both, if you prefer.

**Be sure to use certified gluten-free oat flour for allergies.

Gluten Free Millet and Oat Blender Waffles


Gluten Free Millet and Oat Blender Waffles

Simple gluten free waffles that come together quickly in a blender! Crisp on the outside, fluffy on the inside, and super wholesome.

YIELD: 2 waffles


PREP TIME: 5 minutes


COOK TIME: 10 minutes


TOTAL TIME: 15 minutes

Ingredients:

  • 2 tablespoons chia seeds
  • 1/2 cup millet
  • ½ cup old fashioned oats
  • ½ tablespoon cane sugar
  • ½ tablespoon baking powder
  • Small pinch of salt
  • 1 teaspoon coconut oil, melted
  • 6 tablespoons warm water
  • ⅔ cup unsweetened almond milk
  • 2 tablespoons orange juice
  • 1 teaspoon vanilla extract

Directions:

  1. Preheat waffle iron.
  2. Combine chia seeds, millet, oats, sugar, baking powder, and salt in a blender and blend until a fine powder forms - it will look like regular flour when you're done.
  3. Add the coconut oil, water, almond milk, orange juice, and vanilla to the blender, and blend until smooth.
  4. Pour half of the batter on your waffle iron (I don't need to grease mine, but be sure to grease yours if you do!), and cook according to waffle iron instructions.
  5. Repeat with remaining batter. Serve warm with maple syrup!


Crispy Gluten-Free Graham Crackers (Vegan)

Crispy, gluten-free graham crackers that taste just like the real thing! Vegan, gluten-free, naturally sweetened, and made in 1 bowl. Perfect for s’mores and beyond!
Author Minimalist Baker
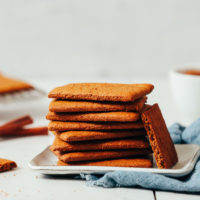
Plate with a stack of homemade gluten free graham crackers
5 from 14 votes
PREP TIME 30 minutes
COOK TIME 15 minutes
TOTAL TIME 45 minutes
Servings 15 (Crackers)
Course Dessert, Snack
Cuisine Gluten-Free, Vegan
Freezer Friendly 1 month
Does it keep? 1 Week

Ingredients

  • 2 Tbsp coconut sugar (or sub organic cane sugar)
  • 1/2 tsp baking soda
  • 1/4 tsp sea salt
  • 1/4 tsp ground cinnamon
  • 1/4 cup maple syrup
  • 1 Tbsp molasses (we used blackstrap molasses)
  • 2 ½ Tbsp melted coconut oil
  • 1 ¼ cup oat flour (ground from gluten-free oats // see notes for substitution ideas)
  • 1/4 cup arrowroot starch (we think cornstarch would also work, and maybe also tapioca starch)
  • 1 ½ tsp ground flax seeds (also called flaxseed meal)

Instructions

  • Preheat the oven to 350 F (176 C) and line a large baking sheet with parchment paper.
  • In a medium mixing bowl, whisk together the coconut sugar, baking soda, salt, cinnamon, maple syrup, molasses, and melted coconut oil until well combined and smooth.
  • Add in the oat flour, arrowroot starch, and ground flax seeds and mix with a wooden spoon until the flour is completely incorporated. Your dough should not feel too tacky (sticking to your hands) or too dry (crumbly), but should hold its form. If the dough appears too dry, it likely just needs more mixing. If it feels sticky, it needs more oat flour.
  • Place a sheet of parchment paper on a large cutting board or countertop. Place dough in the center and then place another sheet of parchment paper on top of the dough. Working from the center out, roll the dough into a large rectangle (~10 x 12 inches) about 1/16-inch thick. Rolling to this thickness makes these crackers crispy (our preferred texture) rather than soft. If you have any difficulty rolling the dough, place it in the fridge to chill for 10-20 minutes and then try again.
  • Use a pizza cutter or knife to cut the dough into 2-inch x 3-inch rectangles (keep in mind they will expand slightly during baking). Then use a metal spatula lightly floured with oat flour to transfer to a baking sheet. If you have a hard time transferring or handling, pop in the refrigerator to chill for 5-10 minutes. Space crackers ~1 inch apart to allow for spreading.
  • Continue rolling out and cutting remaining dough until you have used it all up. Prick each graham cracker twice with a fork. Recipe as written makes ~15 crackers (will vary based on how thinly they are rolled and whether modifying batch size).
  • Bake for 10-14 minutes or until slightly firm and darker in color. Watch closely near the end to avoid burning.
  • Let cool for 5-10 minutes on the baking sheet, then gently transfer to a cooling rack. Enjoy plain, make s’mores, or try our graham cracker crust!
  • Once completely cooled, crackers can be stored in an airtight container for up to 2-3 days at room temperature, 7-10 days in the fridge, or 1-2 months in the freezer. Dough can also be frozen for up to 1 month and rolled/baked after defrosting in the fridge overnight.

waffle recipe


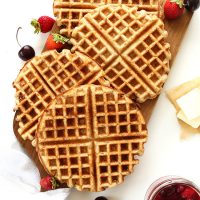
Homemade Freezer Waffles on a cutting board with fresh fruit
4.36 from 167 votes
PREP TIME 15 minutes
COOK TIME 15 minutes
TOTAL TIME 30 minutes
Servings 6 (waffles)
Course Breakfast
Cuisine Gluten-Free, Vegan
Freezer Friendly 1-2 Months
Does it keep? Store in freezer.

Ingredients

WAFFLES

  • 1 1/4 cup unsweetened almond milk
  • 1 tsp white or apple cider vinegar
  • 1/4 cup olive, avocado, or melted coconut oil
  • 1/4 cup agave nectar or maple syrup (or honey if not vegan)
  • 1/2 heaping cup gluten-free rolled oats
  • 1 3/4 cups gluten-free flour blend (we also had success with Bob's Red Mill 1:1 gluten-free flour blend)
  • 1 1/2 tsp baking powder
  • 1 pinch sea salt

OPTIONAL ADD-INS:

  • 1 tsp vanilla extract
  • 1/2 tsp cinnamon
  • 1 Tbsp flaxseed meal
  • 1/4 cup dairy-free chocolate chips
  • 1/4 cup chopped bananas or other fresh fruit

Instructions

  • Combine almond milk and vinegar in a small mixing bowl and let set for a few minutes to curdle/activate. Then add olive oil, agave nectar or maple syrup and whisk. Set aside.
  • Add dry ingredients to a large mixing bowl and whisk until well combined. Then add wet ingredients to dry and mix until well incorporated. The mixture will be slightly thick and scoopable (not too gloppy, not pourable). If too thick, thin with a bit of almond milk. If too thin, add a bit more flour.
  • Test batter for sweetness and flavor.  Add more sweetener or some vanilla extract if desired. I added a touch more agave.
  • Let set for 5-10 minutes while your waffle iron preheats. NOTE: We also tested these in a nonstick Belgian waffle iron and found that while the waffles did not have any issues with sticking, they didn't always fully cook on the inside. If using a Belgian-style waffle maker, we recommend cooking waffles on the medium heat setting but for a longer time (two rounds) and letting them rest for 5-10 minutes after cooking for best texture. 
  • Once waffle iron is ready, generously coat with non-stick spray or oil and pour on about 1/2 cup of batter. Cook according to manufacturer instructions, but cook on the longer range of your waffle iron's suggestion. We find gluten-free waffles tend to take a little longer to cook than gluten waffle. And if you open the waffle iron too early they're more prone to sticking.
  • Once waffle is cooked, carefully remove from waffle maker and place on a baking rack in a 200 degree oven to keep warm. Do not stack; instead, keep them in a single layer to ensure they remain crispy.
  • Serve immediately with desired toppings, such as fresh cherry-berry compote and more maple syrup. Store leftovers in a freezer safe bag and reheat in the toaster for best results (see notes for more instructions). Will keep in the freezer for up to a couple of months, although they're freshest within the first couple of weeks.